What problem does the EasyTerritory EasyMap solve?
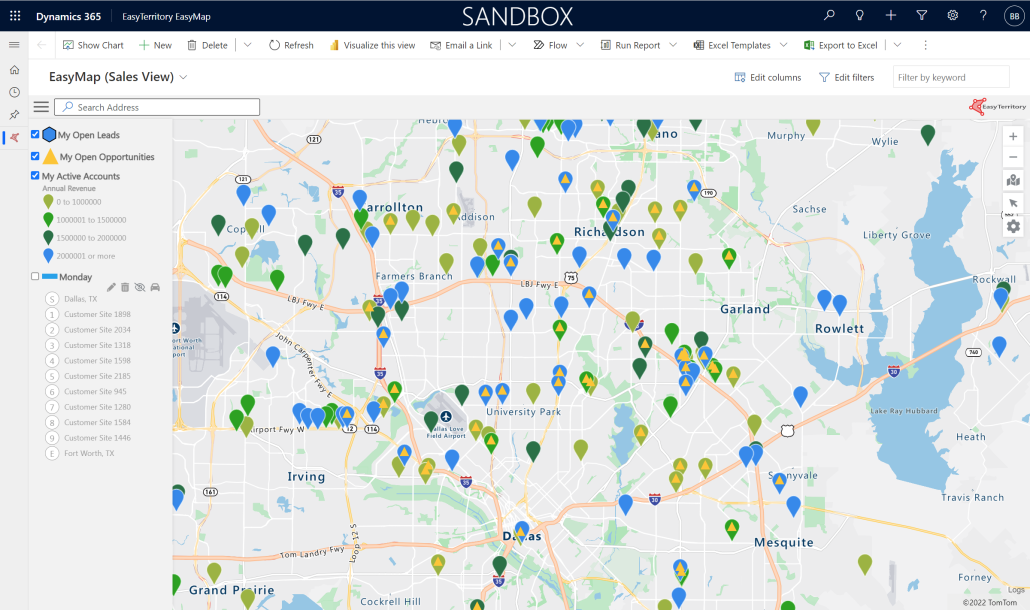
The EasyMap PCF control is the perfect Microsoft Dynamics 365 and Dataverse solution to help improve sales and service rep productivity with multi-location route planning. Most PCF Controls can load records from only one view or entity at a time. EasyTerritory EasyMap supports loading records from multiple views across multiple entities to be displayed on a map within Dynamics 365. On top of being a highly useful multi stop route planner, there are many other useful features available once the map is loaded.
Some of the features available once business data is visible on the EasyTerritory EasyMap include:
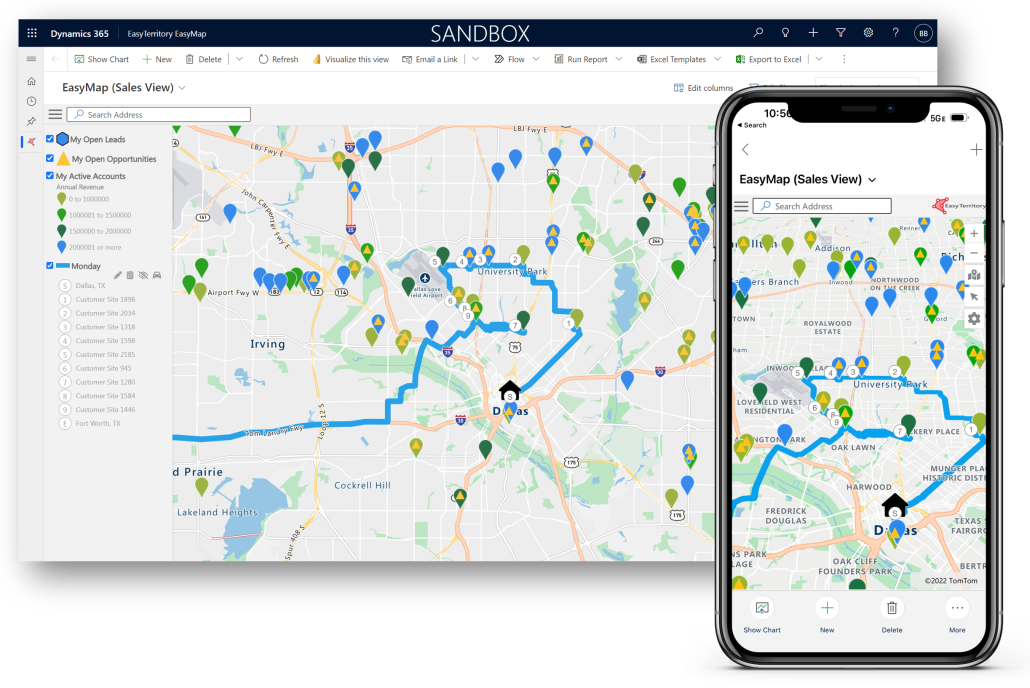
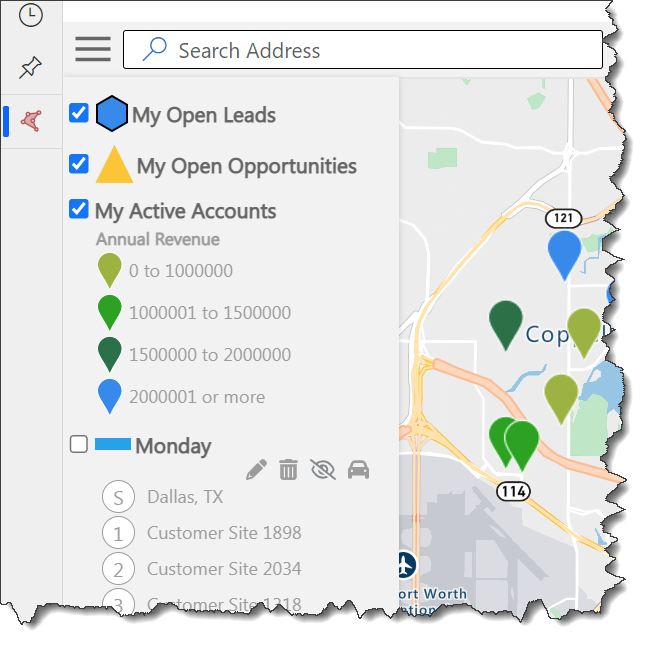
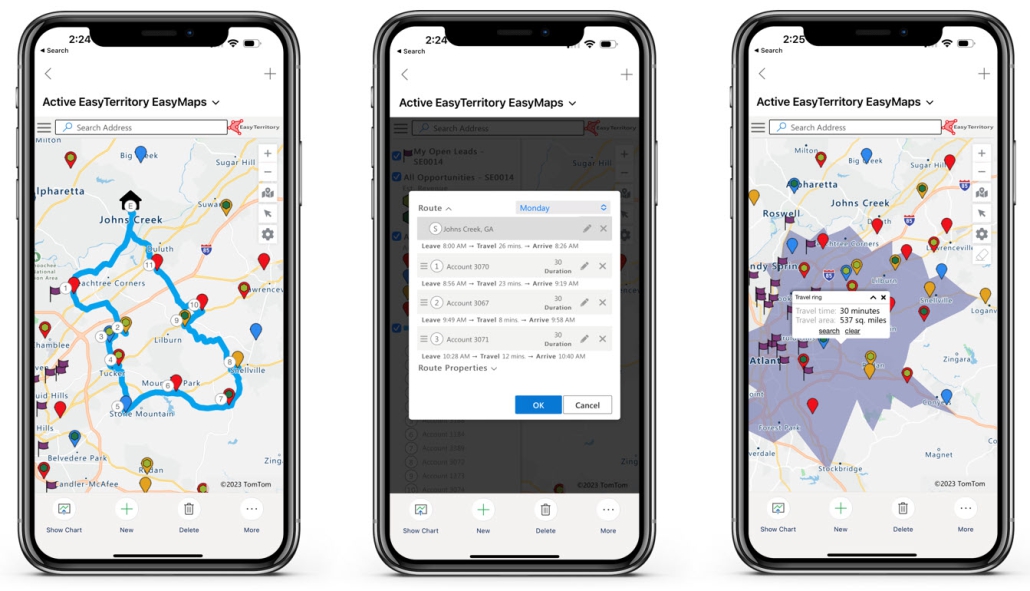
- View customer locations and record details: Get detailed, geographical data insights for each plotted entity within a clean, interactive Dynamics 365 map view. This view essentially acts as a CRM map. Way easier than sales route planning in Excel!
- Create multiple stop routes and schedules: Automatically create your daily driving route within your service or sales territory (with unlimited stops).
- Create travel-time rings: Create travel rings to see how far accounts are from you while in the field.
- Calculate distance and travel time between locations: Perform quick calculations to check distance and time between two accounts.
- Launch voice navigation via Google Maps, Apple Maps, or Waze: Launch your preferred mapping app directly from the EasyMap PCF Control route planning app.
EasyMap Requirements:
EasyMap Configuration Steps:
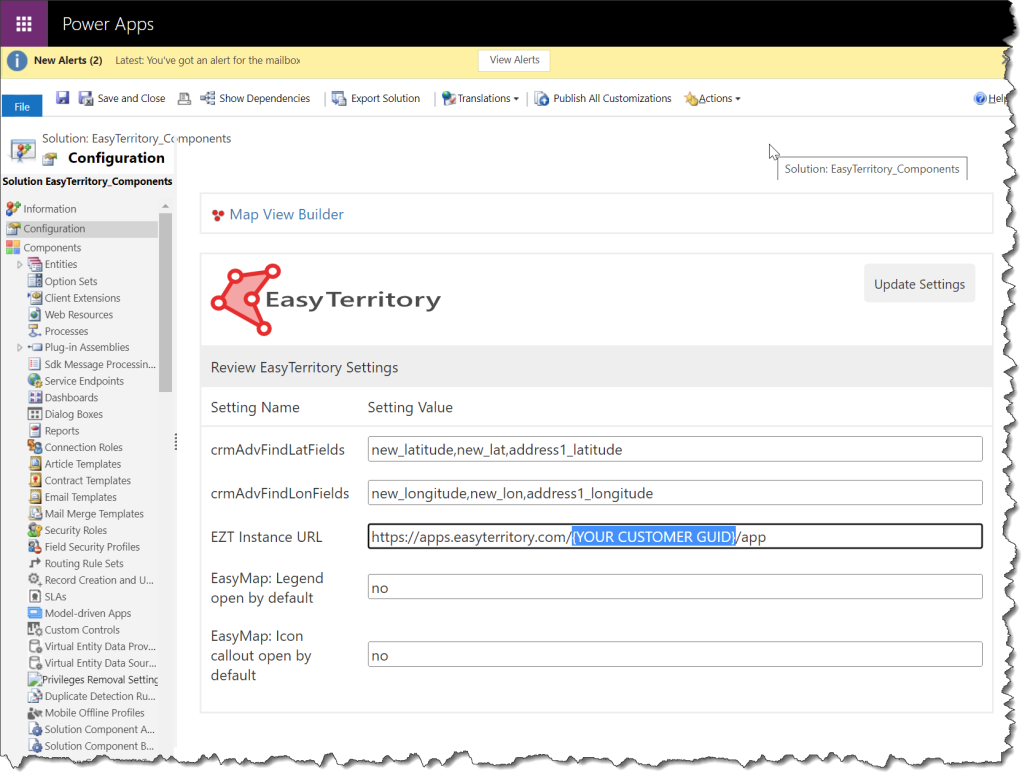
To configure EasyTerritory EasyMap as your dedicated Dynamics 365 or Dataverse instance, please follow the below steps:
- Import the EasyTerritory Managed Solution into Dynamics 365 from Microsoft AppSource, and configure connection to EasyTerritory Enterprise Subscription URL (register for trial here).
- EasyMap displays records on a map with a valid Latitude and Longitude, and these columns must be saved as part of the Advanced Find view. NOTE: Latitude and Longitude must be populated on the entity record to use EasyMap. If the data is not already geocoded, use the EasyTerritory Geocode Workflow Plugin to geocode your data with Azure Maps.
- Open the Microsoft Dynamics 365 drop down on the top left to switch to the EasyTerritory EasyMap app.
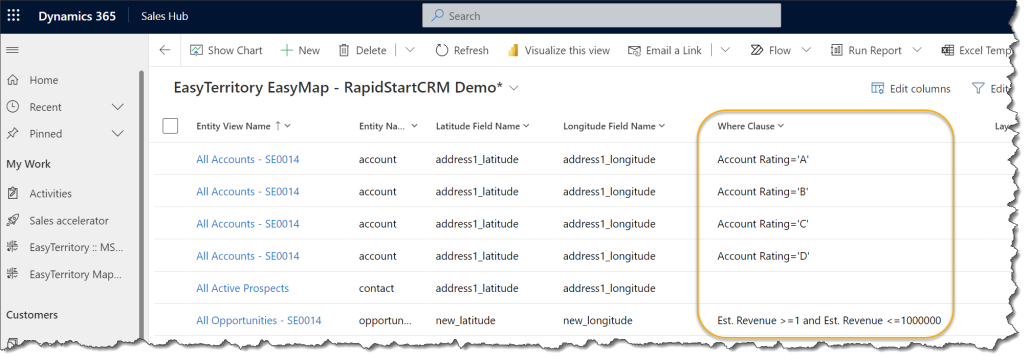
- Click the +New icon to create a new EasyTerritory EasyMap configuration record. The configuration records are used to determine the cartography of the icons on the map.
- Entity View Name: Name of the view, must match the view name in D365 exactly.
- Entity Name: Schema name of the entity, must be in lower case.
- Latitude Field Name: Field with Latitude value. Use the schema name (e.g. address1_latitude). Must be in lower case. Note: This can be a latitude field from a related record.
- Longitude Field Name: Field with Longitude value. Use the schema name (e.g. address1_longitude). Must be in lower case. Note: This can be a longitude field from a related record.
- Where Clause: Where clauses can be added to set icon symbol base on a certain criteria.
- Format for an exact value classification where clause: Display Name (matching case) = ‘value’ (example: Account Rating=’A’)
- Format for a range classification value where clause: Display Name (matching case) >= ‘value’ and Display Name (matching case) <= ‘value’ (example: Est. Revenue >= 1000001 and Est. Revenue <=10000000). For currency fields, $ are acceptable (example: Est. Revenue >= $1000001 and Est. Revenue <=$10000000)
- Note: A separate configuration is required for each classification. Configurations with the same Entity View Names will be grouped together in the legend.
- Layer Symbol Icon: These are out-of-box icons that can be used for symbology.
- Layer Symbol Primary Color: Defines the fill color of the Layer Symbol Icon.
- Layer Symbol Secondary Color: Defines the outline color of the Layer Symbol Icon.
- Layer Symbol Size: Defines the outline color of the Layer Symbol Icon or the Symbol SVG
- Symbol Offset X: Defines the X offset of the Layer Symbol Icon or the Symbol SVG.
- Symbol Offset Y: Defines the Y offset of the Layer Symbol Icon or the Symbol SVG.
- Symbol SVG: If used, this overrides the the Layer Symbol Icon property.
- Layer Order: Sets the layer order for the entry in the legend.
- Disable Routing: (Yes or No) If set to “Yes” layer record cannot be used in a route.
- Map Type: This is a string value that can be entered to filter the configurations for a view in the app. This will allow different maps with different views. To configure, add a Filter to a new EasyMap entity view that matches the Map Type value.
- Save the New EasyTerritory EasyMap configuration and launch the map from the EasyTerritory EasyMap icon in the navigation bar on the left.
 Your team can leverage PowerApps to map multiple locations. Just browse to the EasyTerritory EasyMap in the PowerApp portal and select the EasyTerritory EasyMap, then share the app with users in your organization. With the ability to create custom PowerApps map routes, your team will be more efficient in planning sales routes.
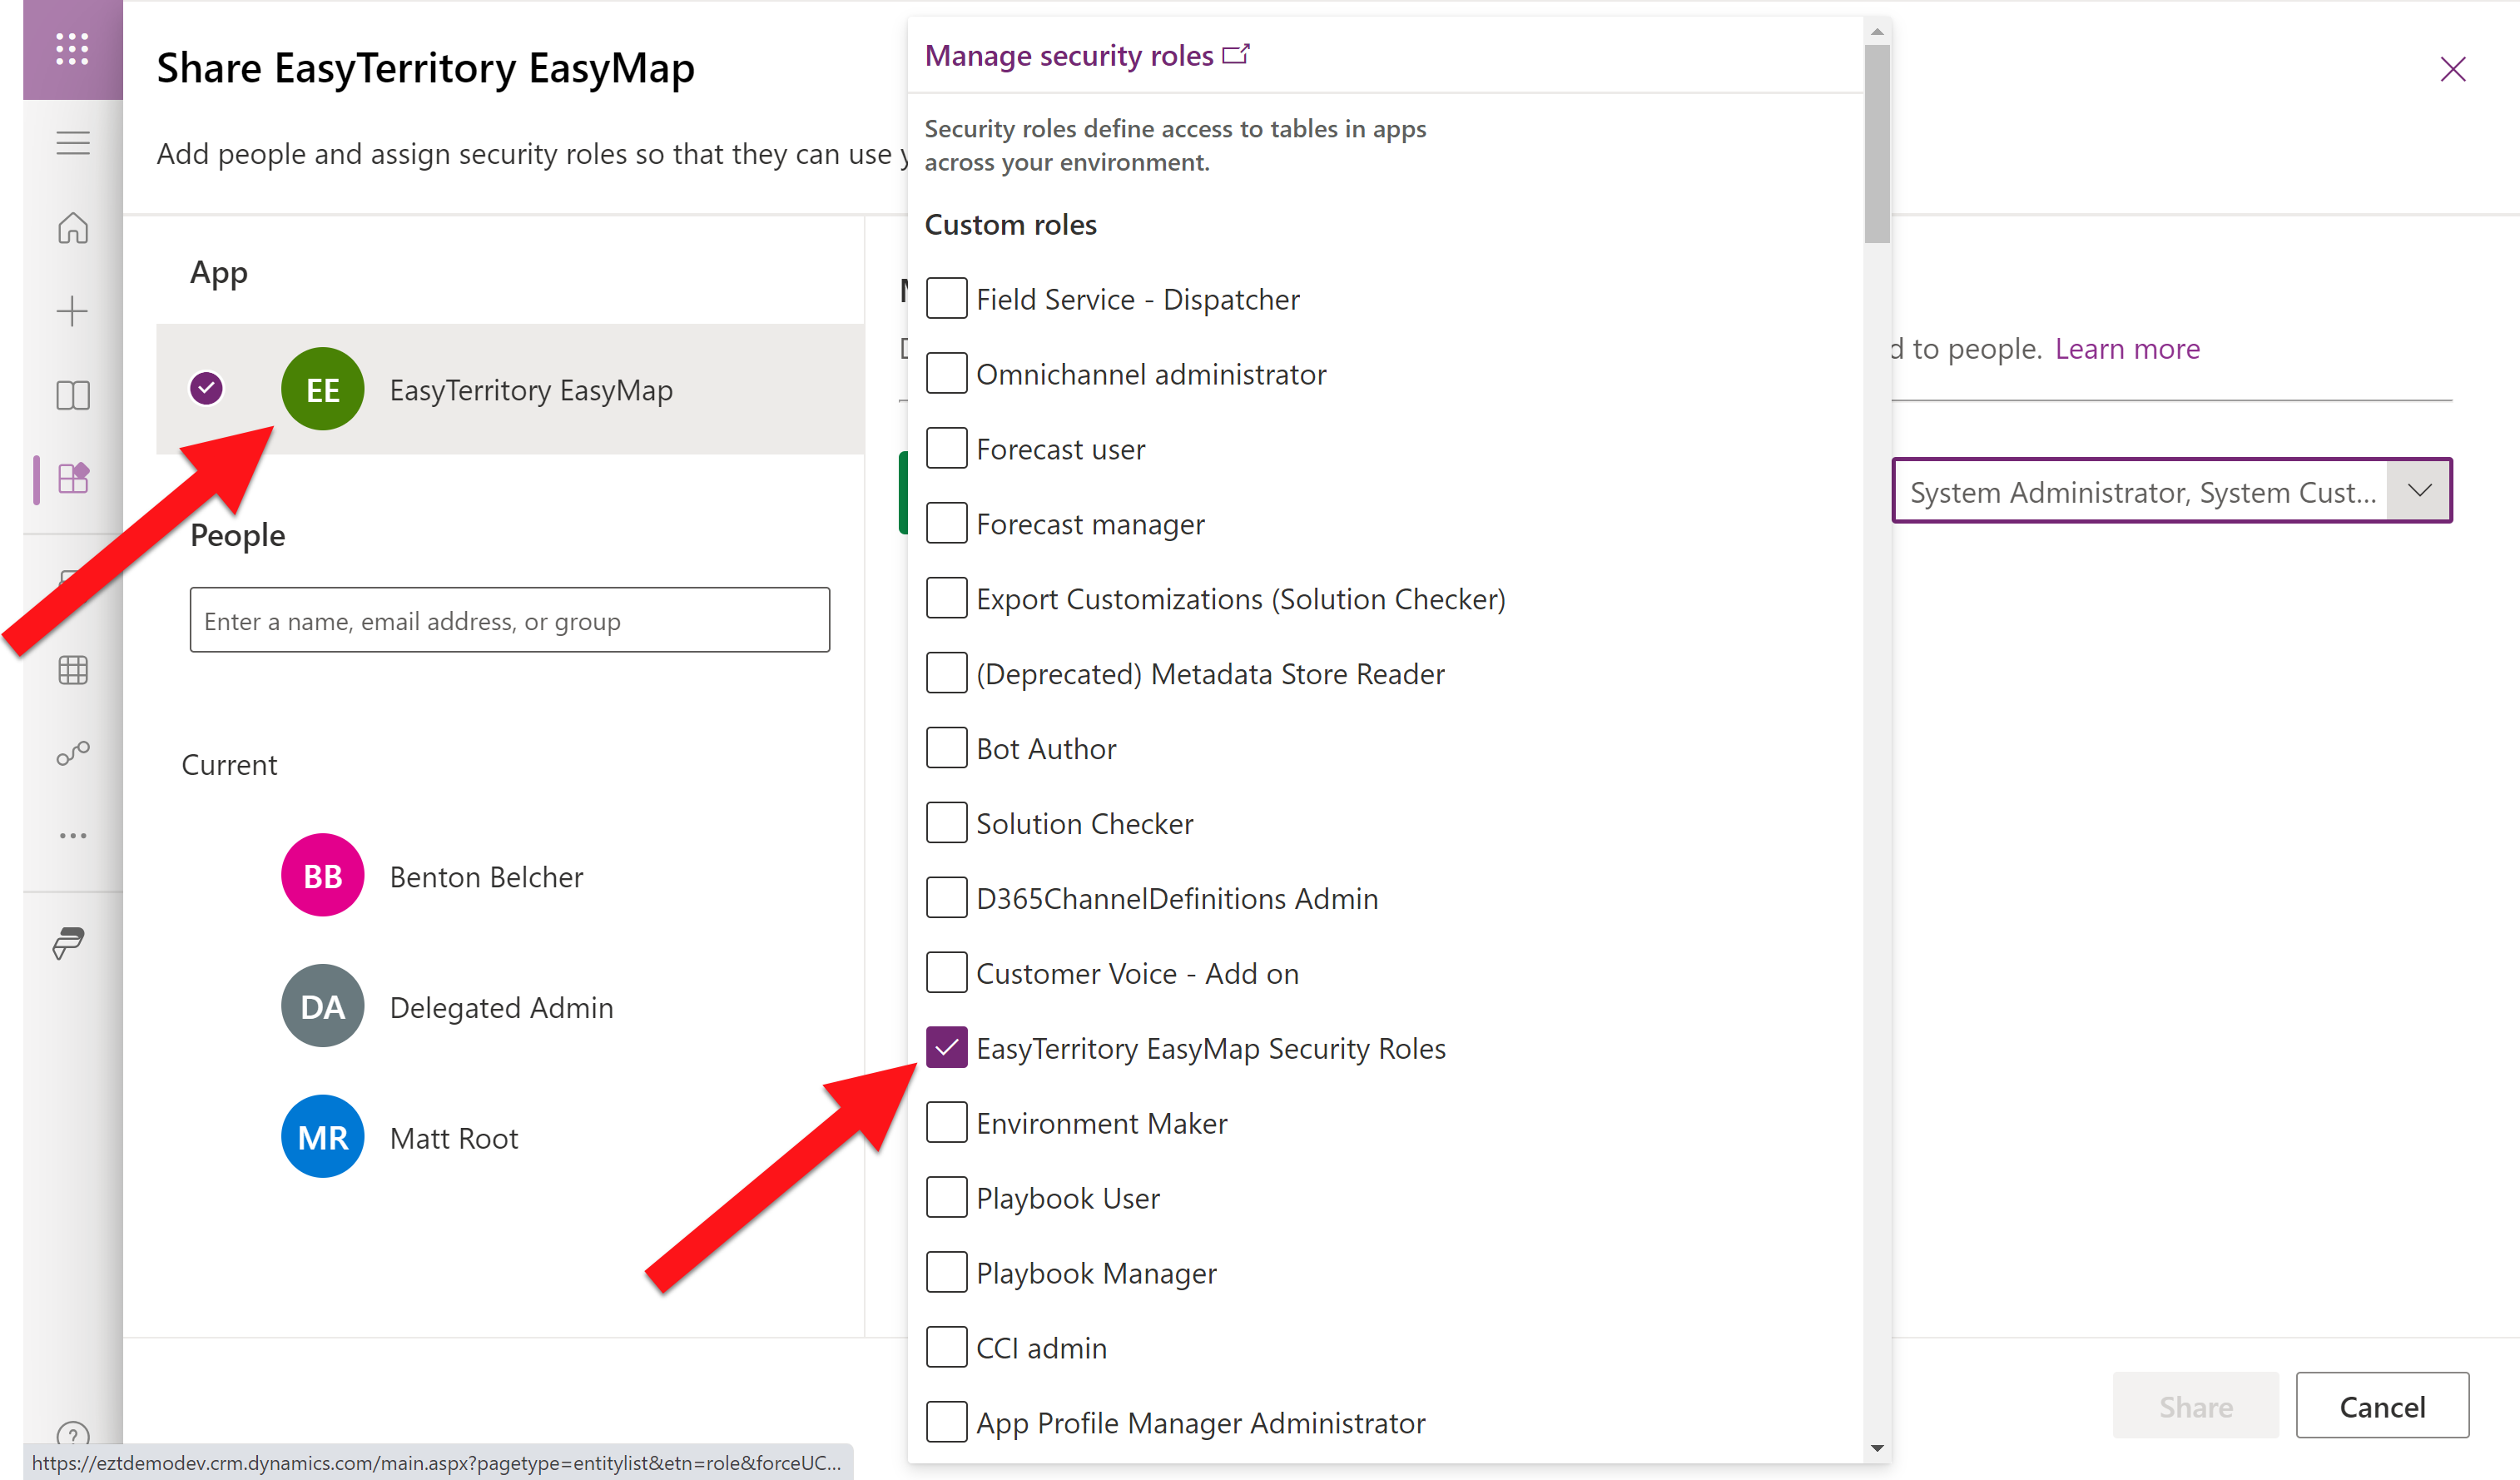
- Finally, add users to the ‘EasyTerritory EasyMap Security Roles’ and share config records. This will give ‘Read’ permission to the underlining EasyTerritory EasyMap Entity.
- First confirm that the ‘EasyTerritory EasyMap Security Roles’ has been added to the EasyTerritory EasyMap App.
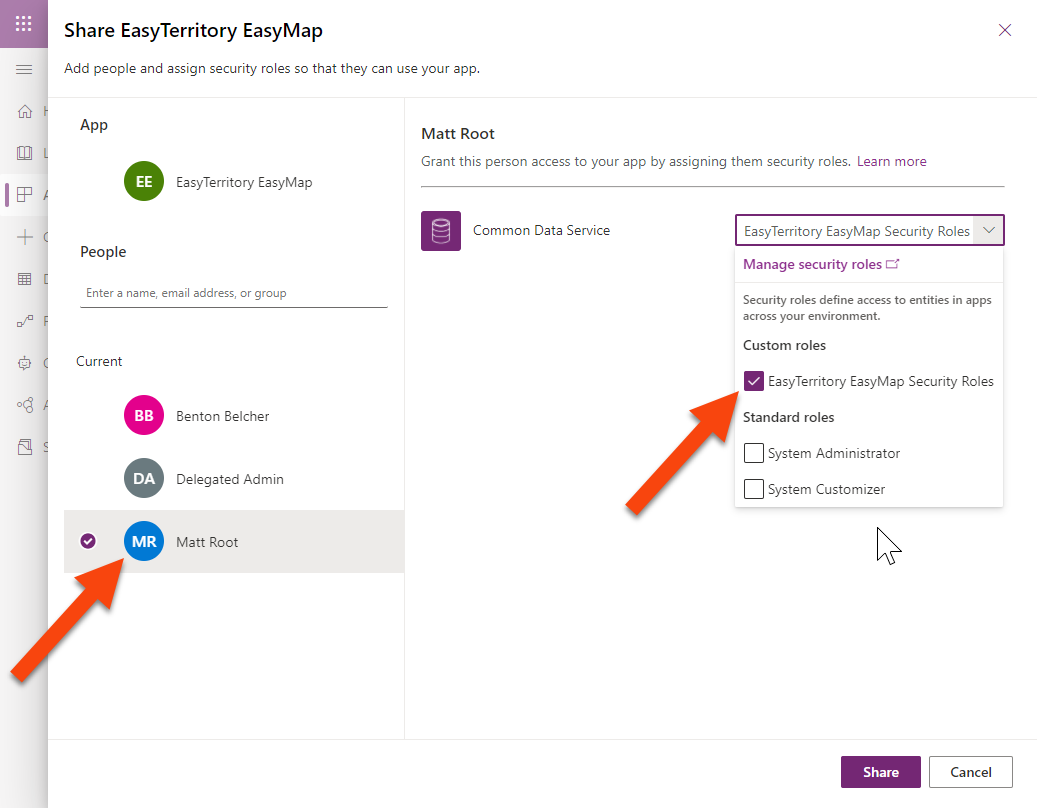
- Then, share the app with a user or a team.
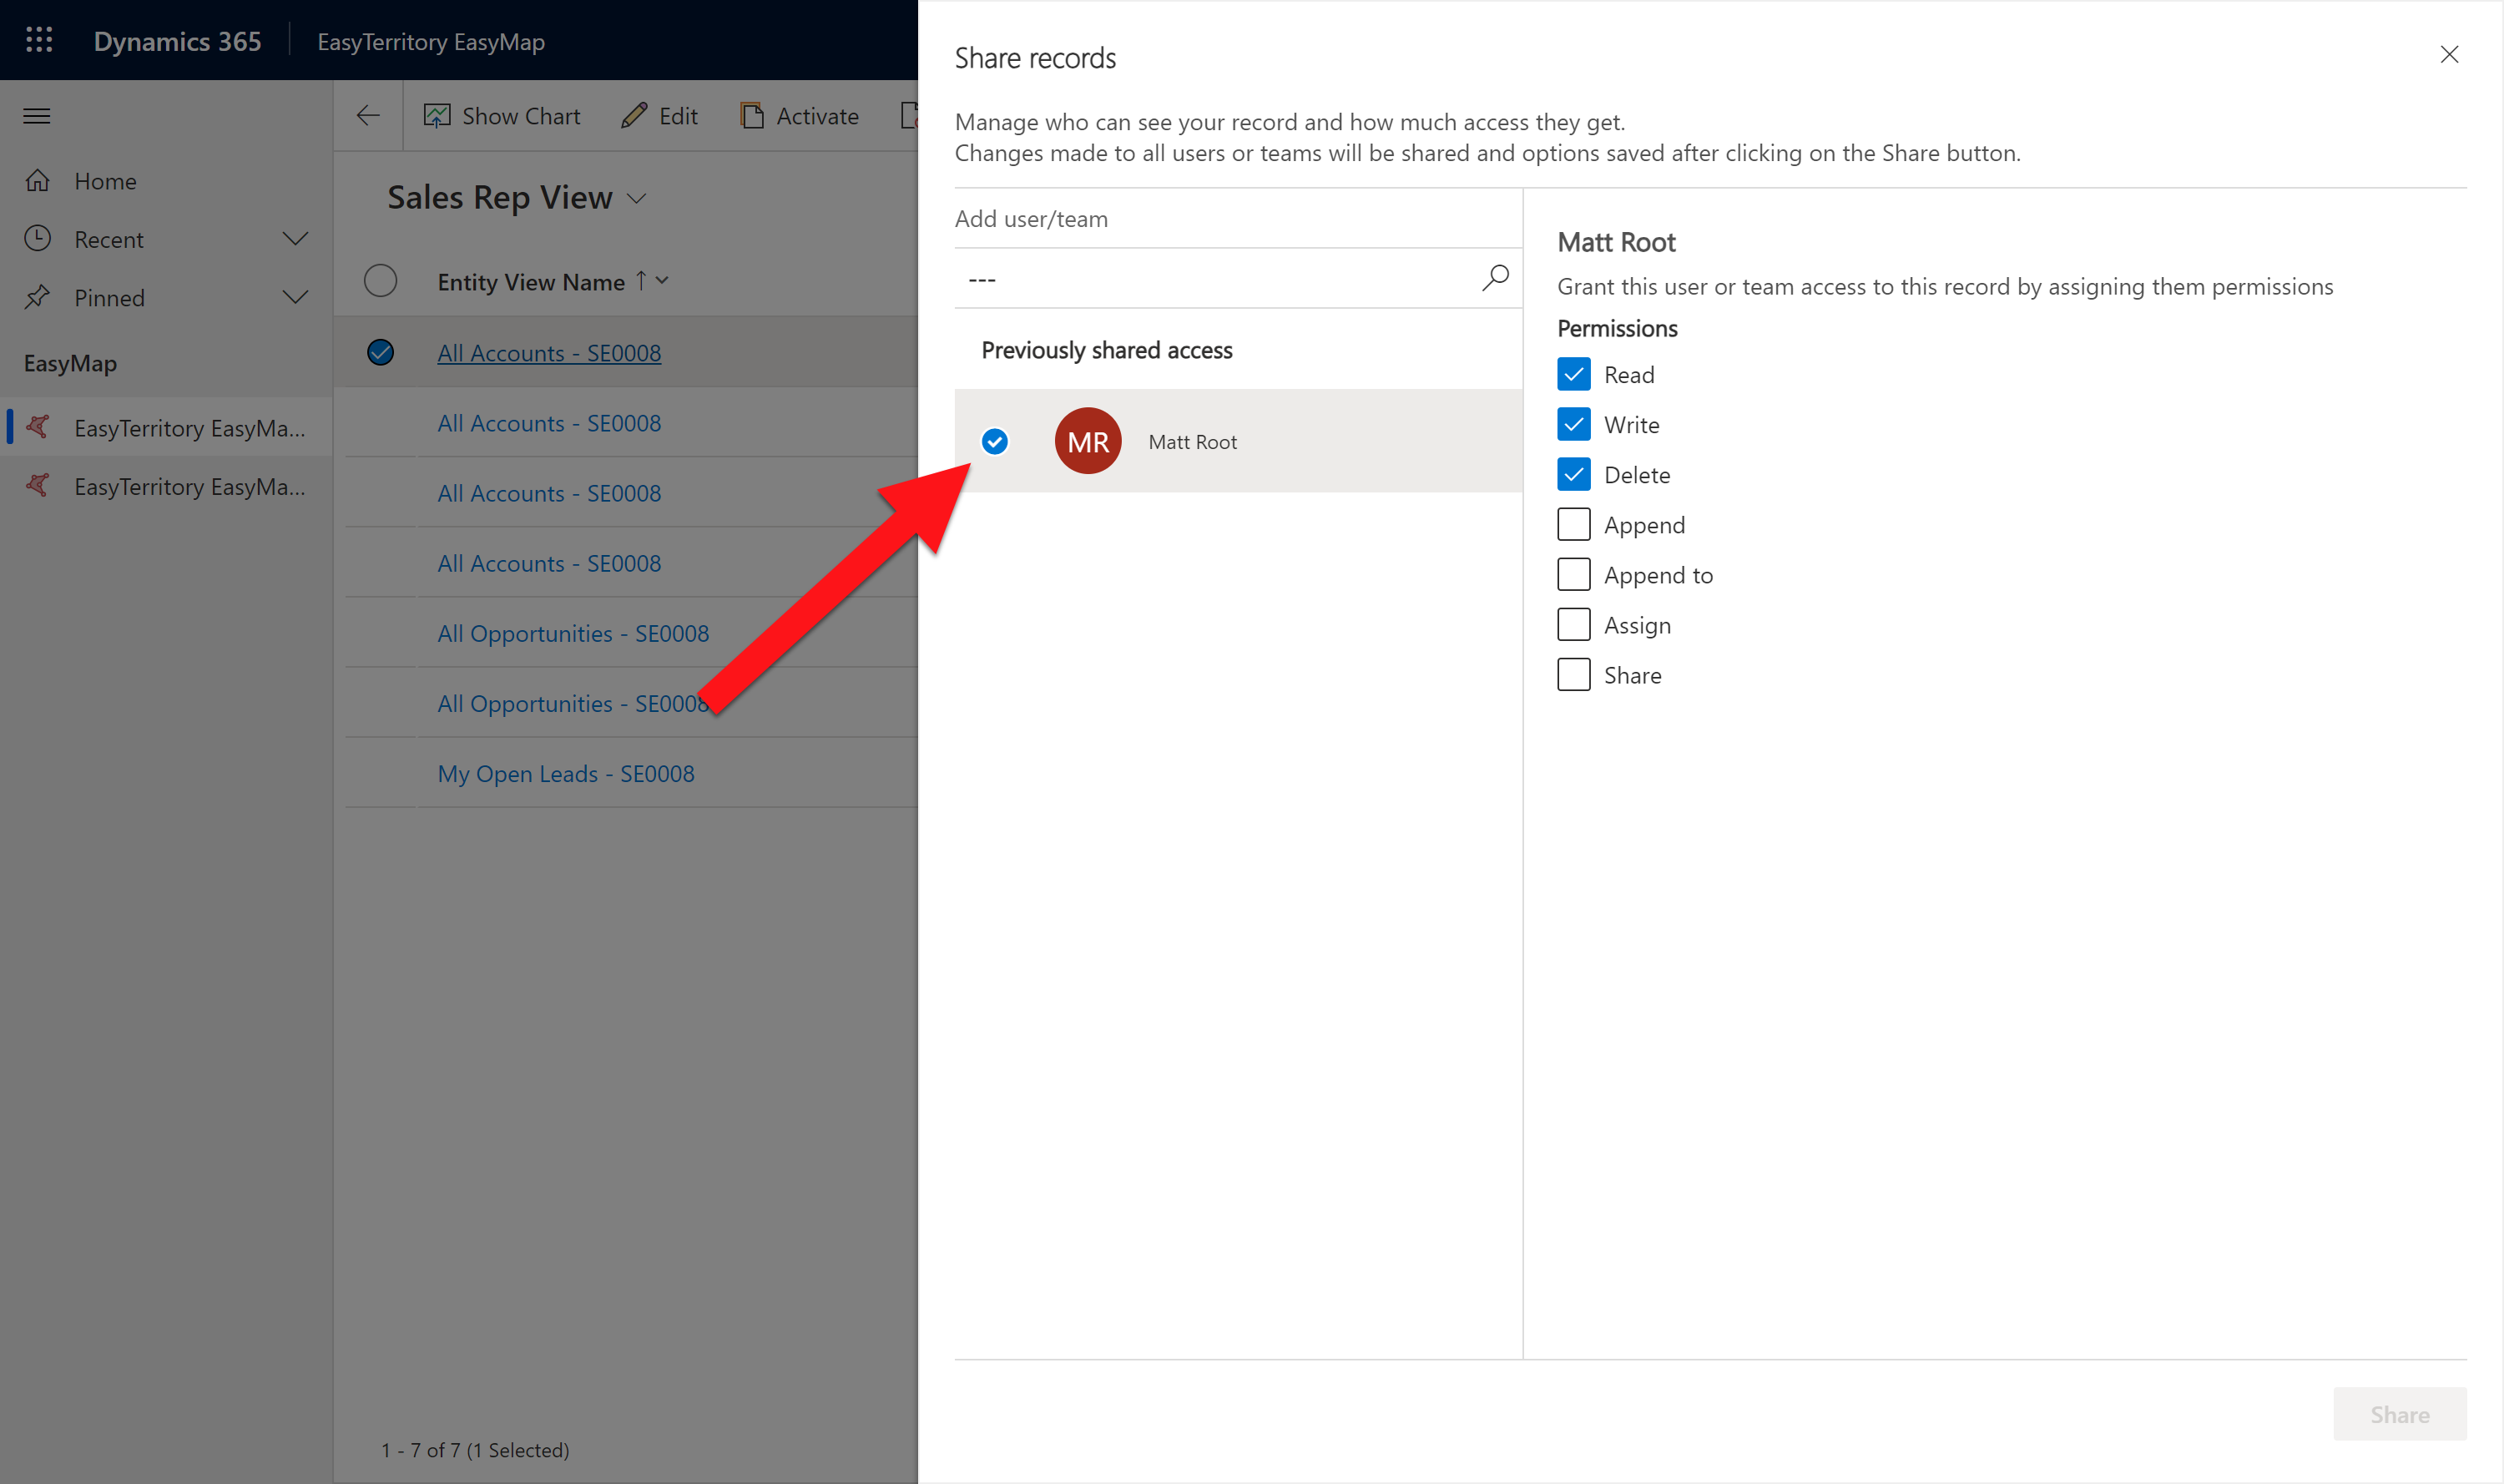
- Lastly, if you would like share a map configuration, in the EasyTerritory EasyMap entity, share config records with a user or team.
- Now the EasyTerritory EasyMap can be accessed through the Dynamics 365 mobile app as shown below. Once EasyMap has been configured, each sales and field rep on your team will have the power to build custom D365 routes in a friendly, cross-platform route planner app. They will have the ability to view customer data, addresses & relevant locations, create travel-time rings, and calculate distance and travel time between their current location and a selected customer. Directions can be launched via Google Maps, Apple Maps, or Waze Maps.
For questions, contact us at support@easyterritory.com.

