
Learn how to set up, configure, and begin using EasyTerritory EasyMap PCF for Power Apps.
In this article
- Import and configure the EasyTerritory Managed Solution
- Prepare Your Records for Mapping
- Access the EasyMap App
- Create EasyMap configuration records
- See Your Map
- Share Map
Import and Configure the EasyTerritory Managed Solution
- In the Power Apps Maker Portal, import the EasyTerritory Managed Solution from Microsoft AppSource into the Power Apps environment you choose. Make sure this environment already has Dynamics 365 Sales installed.
- In the EasyTerritory Solution configuration page, enter your EasyTerritory Enterprise Subscription URL in the “EZT Instance URL” field.
To access this page within the Power Apps Maker Portal, select Solutions in the navigation panel and navigate to: EasyTerritory_Components → Overview (located in navigation panel) → View Page (located under the Configuration page subtitle).
You don’t have an EasyTerritory subscription yet… (You can register for a trial here.)

Prepare Your Records for Mapping
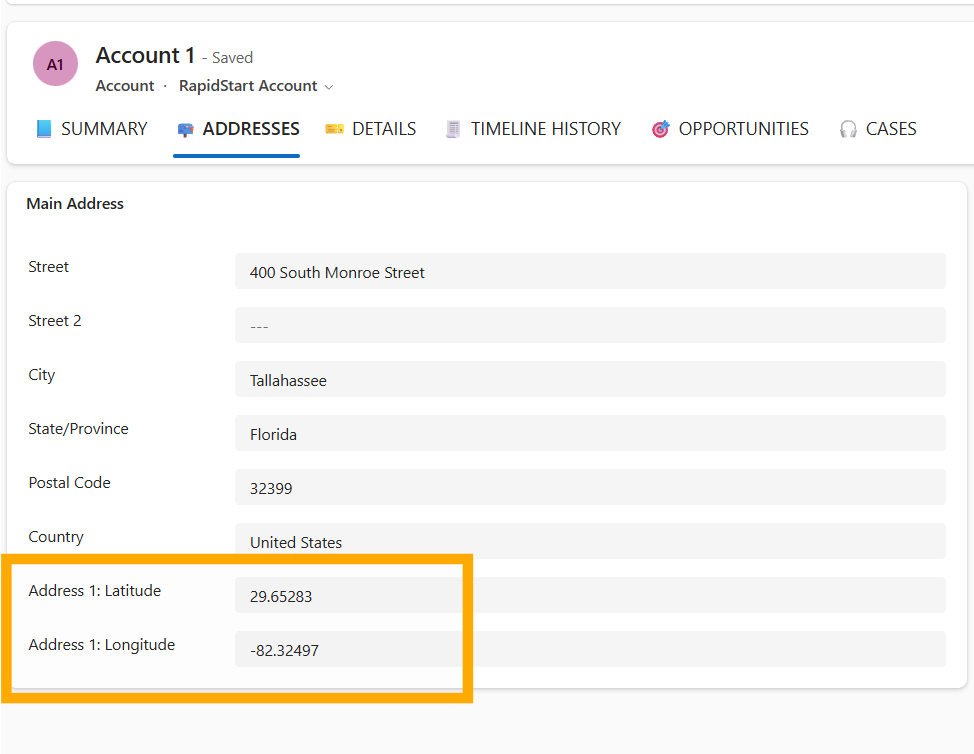
- Latitude and Longitude Fields
For any entity records you want to display in EasyMap, make sure the Latitude and Longitude fields are filled in. These fields store the location coordinates needed to place each record on the map. You can use the out-of-the-box ‘Address 1: Longitude’ or ‘Address 2: Latitude’ or any custom fields that your organization uses for location coordinates. If your records don’t already have this location information populated, you can use the EasyTerritory Geocode Workflow Plugin to automatically add the latitude and longitude coordinates to your records using Azure Maps.
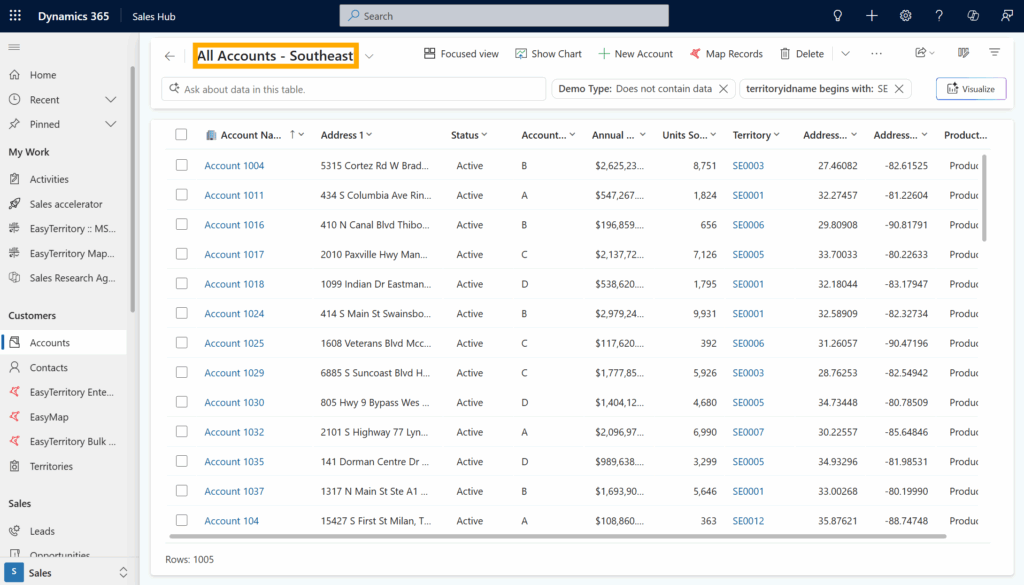
- Entity View
You can map either System Views or Personal Views. Make sure any fields you want to display in EasyMap are included in the entity view.
Access the EasyMap Power App
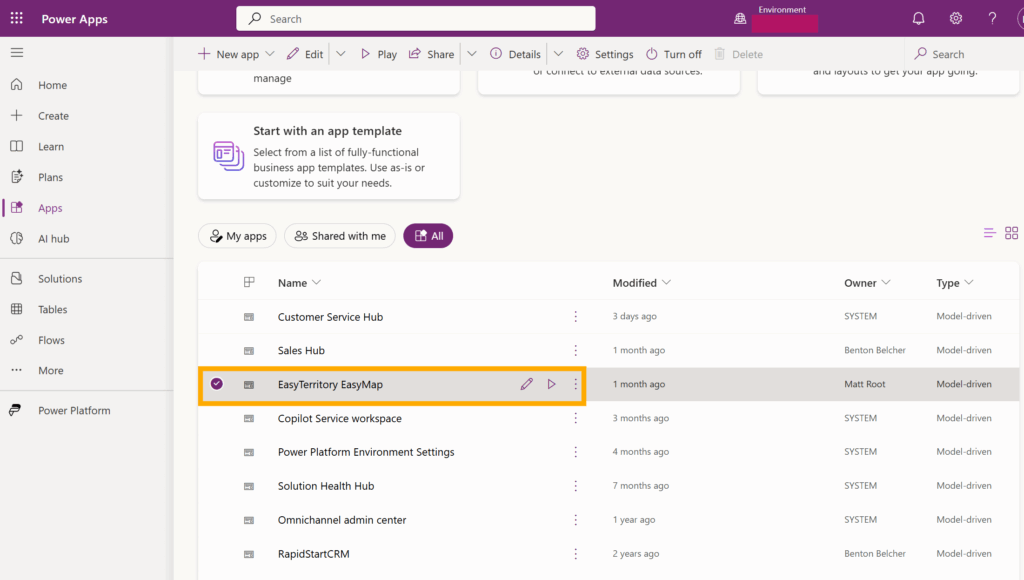
In Power Apps Maker Portal, navigate to the environment where you installed the EasyTerritory solution. In the left navigation menu, select Apps. On the Apps page, choose All Apps. Locate EasyTerritory EasyMap in the list, then hover over the row—a ▷ play icon will appear. Click that icon to open the EasyMap model driven app.
Creating a New EasyMap Configuration
A configuration record determines the entity view EasyMap should load and how the resulting records should appear on the map. The records from that view are rendered as a layer of points, allowing you to control their icons, colors, ordering, filtering, and visibility.
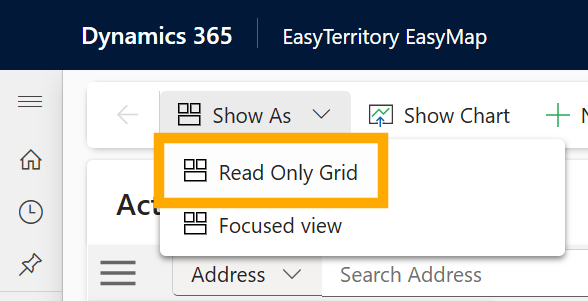
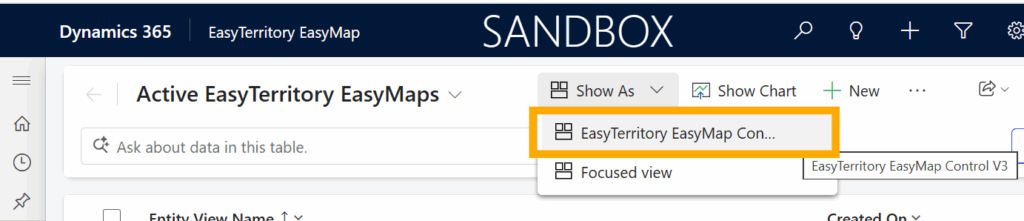
To create a configuration record, go to the upper-left corner of the EasyMap Power App and click the Show as button in the command bar, then select Read-only grid. This opens the grid view, where you can view existing records and create new EasyMap configuration records. See EasyMap Configuration Record Fields for details about each field. After completing the configuration record, click Save and Close.
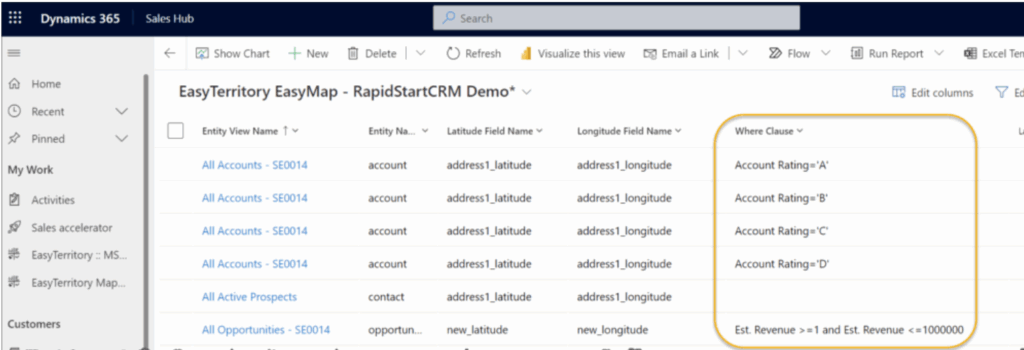
EasyMap Configuration Record Fields
The configuration record includes required and optional fields that define which records you want to display and how those records should appear on the map.
- Entity View Name
The name of the entity view. This must match the name of the view in Dynamics 365 exactly.
- Entity Name
Enter the schema name of the entity, in lowercase.
Examples: account, lead
- Latitude Field Name
The field containing the latitude value. Use the schema name (for example: address1_latitude). Must be in lowercase.
Note: This can be a field from a related record.
- Longitude Field Name
The field containing the longitude value. Use the schema name (for example: address1_longitude). Must be in lowercase.
Note: This can be a field from a related record.
- Where Clause
Where clauses determine which icon symbol is used for a record based on its field values. See Where Clause Formats for syntax and examples.
- Visualization Dropdown Order
If you have multiple Where Clauses for the same Entity View, each one becomes a separate visualization in EasyMap. These visualizations appear as a button dropdown list inside the legend. The Visualization Dropdown Order controls the order in which they appear in that list.
- Visualization Icon Order in Legend
Determines the order of the each where clause in the visualization that will be displayed in the legend.
- Layer Symbol Icon
Out-of-the-box icons that can be used for layer symbology.
If you want to use a custom icon, see Symbol SVG field
- Layer Symbol Size
Defines the size of the Layer Symbol Icon or the Symbol SVG.
- Layer Symbol Fill Color
Defines the fill color of the Layer Symbol Icon.
Note: To use a custom color, see Layer Symbol Fill Color Custom field.
- Layer Symbol Fill Color Custom
Allows you to enter a custom fill color for the layer symbol. This value is used only when the Layer Symbol Fill Color option is set to Custom. You can enter any valid color value, such as a hex code (e.g.,#FF5733).
- Layer Symbol Border Color
Defines the outline color of the Layer Symbol Icon.
- Layer Symbol Border Color Custom
Allows you to enter a custom border color for the layer symbol. This value is used only when the Layer Symbol Border Color option is set to Custom. You can enter any valid color value, such as a hex code (e.g.,#FF5733).
- Layer Visible By Default
Controls whether this layer is shown on the map when EasyMap first loads. If set to Yes, the layer is visible immediately. If set to No, the layer is hidden until the user enables it in the map’s layer controls.
- Symbol Offset X
Defines the X (horizontal) offset of the Layer Symbol Icon or the Symbol SVG.
- Symbol Offset Y
Defines the Y (vertical) offset of the Layer Symbol Icon or the Symbol SVG.
- Layer Symbol SVG
Use your own custom icon for the layer symbol by pasting the SVG for that icon (the text that starts with<svgand ends with</svg>) into this field. If set, this overrides the Layer Symbol Icon property.
- Layer Order
Sets the layer order for the entry in the legend.
- Disable Routing (Yes or No)
If set to Yes, this layer’s records cannot be used in a route.
- Routing Address Field Names
Specifies which fields from the entity record should be used to build the address for routing. Enter one or more logical field names (such as address1_line, address1_city, address1_state, address1_postal code) to define the full address that EasyMap will use when passing routes to Apple and Google maps. You can include multiple fields, and EasyMap will combine them into a complete routing address.
- Hyperlinks
Use this field to add clickable links that appear in the record’s callout. See Hyperlink formats for syntax and examples.
- EZT GeoJSON URL
Provides a link to EasyTerritory GeoJSON resource that EasyMap will use to display shapes (such as territories, boundaries, or custom regions) on the map. When this field is populated, EasyMap will load the geometry from that GeoJSON and display it as a layer on the map. See create Territories in EasyTerritory Designer for more info.
- Map Type
A string value used to filter configurations for a specific view in the app. This allows you to define different maps with different views. To configure, add a filter to an EasyMap entity view that matches the Map Type value.
Where Clause Formats
-
Exact Value Classification
Use this format when matching a specific value:
Display Name = 'value'Example:
Account Rating = 'A' -
Range-Based Classification
Use this format when matching a numeric or date range:
Display Name >= 'value' AND Display Name <= 'value'Example:
Annual Revenue >= 1000001 AND Annual Revenue <= 10000000For currency fields, dollar signs are allowed:
Example:
Annual Revenue >= $1000001 AND Annual Revenue <= $10000000
Note:
- A separate configuration record is required for each classification.
- Configurations that share the same Entity View Name will be grouped together in the map legend.
See Your Map
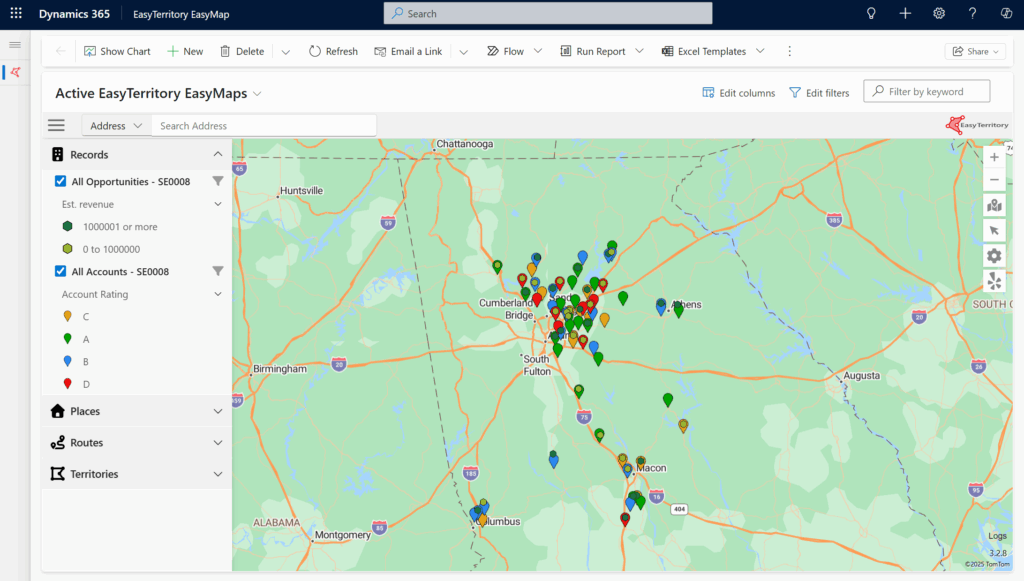
- From Power Apps Maker Portal:
Navigate to the environment where you installed the EasyTerritory solution. In the left navigation menu, select Apps. On the Apps page, choose All Apps. Locate EasyTerritory EasyMap in the list, then hover over the row—a ▷ play icon will appear. Click that icon to open the app
- From EasyMaps configruation record:
If you have just completed an EasyMaps configuration record, click Save and Close on the record form. After saving, you will be returned to the grid view, where you can see the list of your configuration records. To view the map with your configuration applied, click Show as in the command bar and select EasyTerritory EasyMap Control.
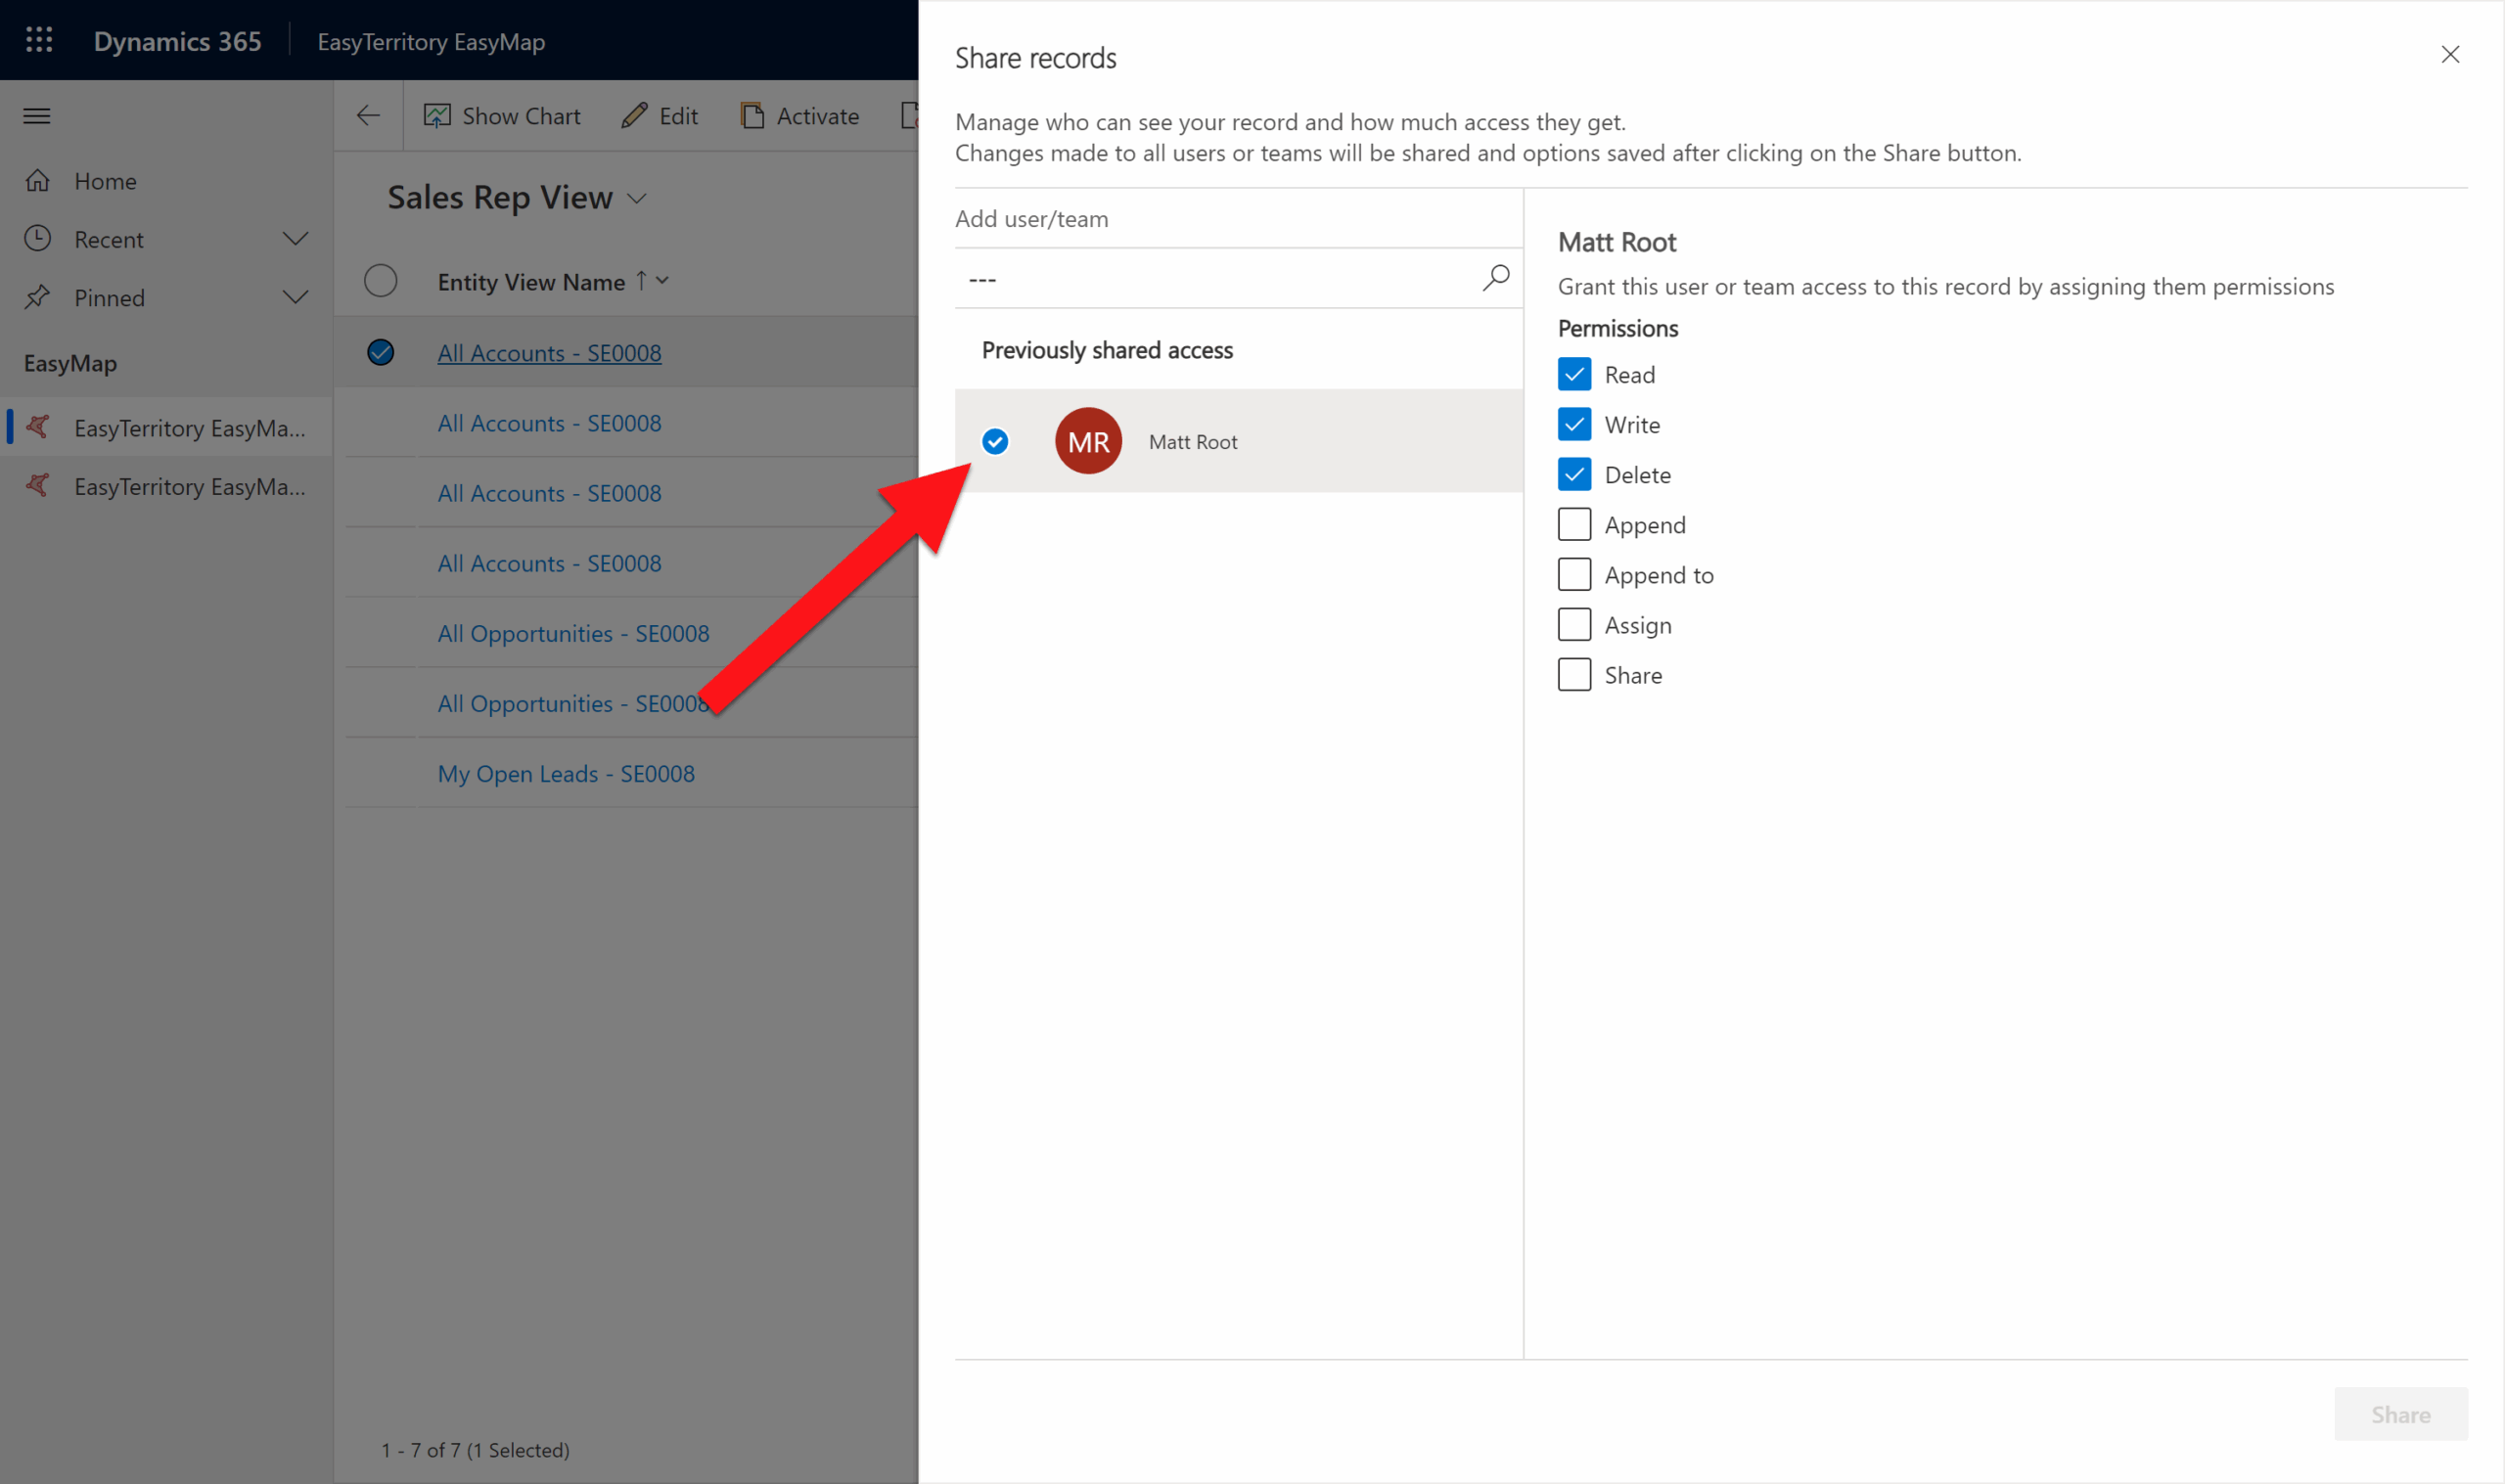
Share Map
Browse to EasyTerritory EasyMap in the Power Apps Maker Portal, open the app, and share it with users in your organization. With the ability to create custom map routes in EasyMap, your team can plan and manage sales routes more efficiently.
Next, add users to the EasyTerritory EasyMap Security Roles and share the relevant configuration records. This grants them Read access to the underlying EasyTerritory EasyMap entity.
Before proceeding, confirm that the EasyTerritory EasyMap Security Roles have been added to the EasyTerritory EasyMap app.
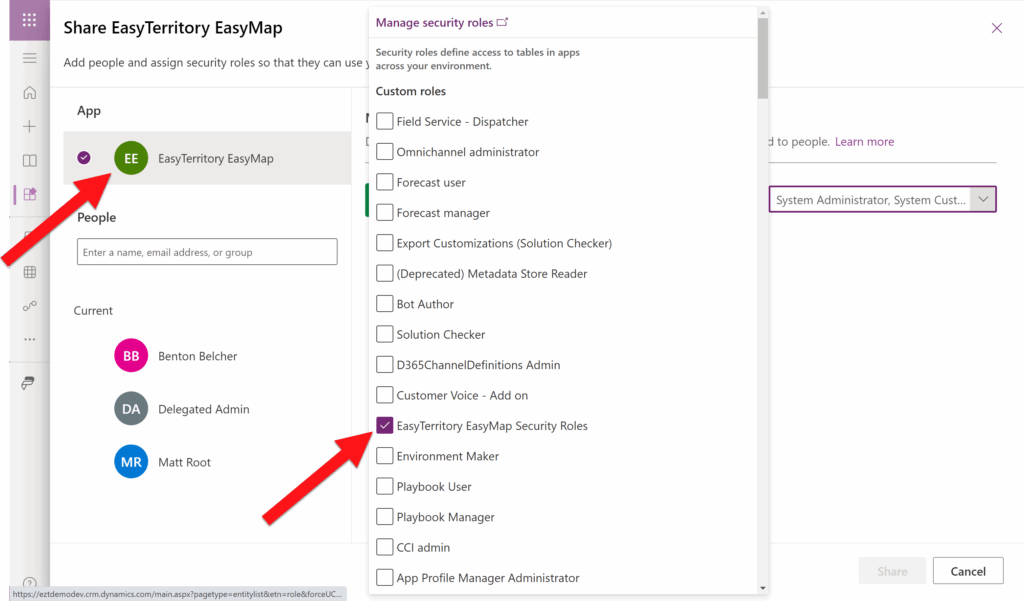
Then, share the app with a user or a team.
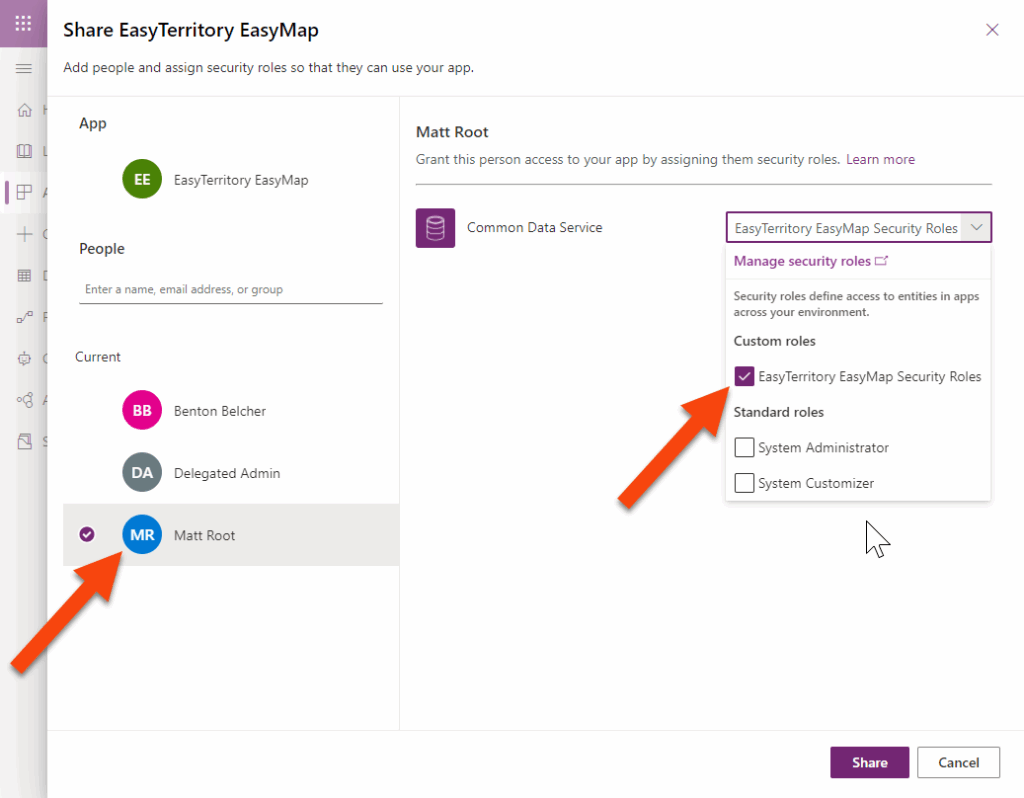
Lastly, if you would like share a map configuration, in the EasyTerritory EasyMap entity, share config records with a user or team.
Now the EasyTerritory EasyMap can be accessed through the Dynamics 365 mobile app as shown below. Once EasyMap has been configured, each sales and field rep on your team will have the power to build custom D365 routes in a friendly, cross-platform route planner app. They will have the ability to view customer data, addresses & relevant locations, create travel-time rings, and calculate distance and travel time between their current location and a selected customer. Directions can be launched via Google Maps, Apple Maps, or Waze Maps.
For questions, contact us at [email protected].