
This documentation applies to EasyTerritory integrated with Microsoft Dynamics 365 Sales (model-driven apps built on Microsoft Dataverse).
The Postal Code Location Lookup Workflow Plugin takes a postal code value from a record and performs a lookup against an EasyTerritory project. Based on the result, the record is assigned to the appropriate territory defined in EasyTerritory.
This plugin is commonly used for:
- Lead or Account territory assignment
- Territory realignment
The Postal Code Location Lookup plugin is implemented as a workflow activity and is configured as a step within a Dynamics 365 workflow process.
Setup Steps
Step 1. Install the EasyTerritory Managed Solution
Install the EasyTerritory managed solution into Dynamics 365 Sales.
The managed solution is available from the Microsoft Marketplace
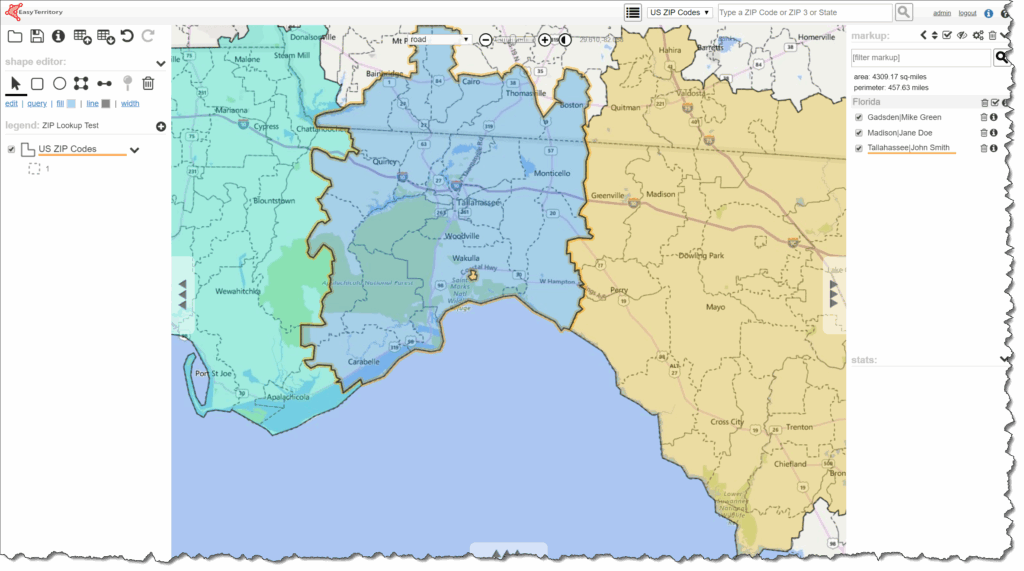
Step 2. Build Territories in EasyTerritory
In the EasyTerritory Designer, build your territories using geographic data such as U.S. ZIP Codes, then save the project using the Project Markup Plugin.
Step 3. Import Territories into Dynamics 365
Export your territory list from EasyTerritory and import it into Dynamics 365.
- Export territories from EasyTerritory, including their markupId values.
- Import the data into Dynamics 365 using either:
- The out-of-the-box Territory entity, or
- A custom territory entity
Before importing:
- Create a text field on your territory entity to store the markupId
- This field is commonly named something like
new_eztkey
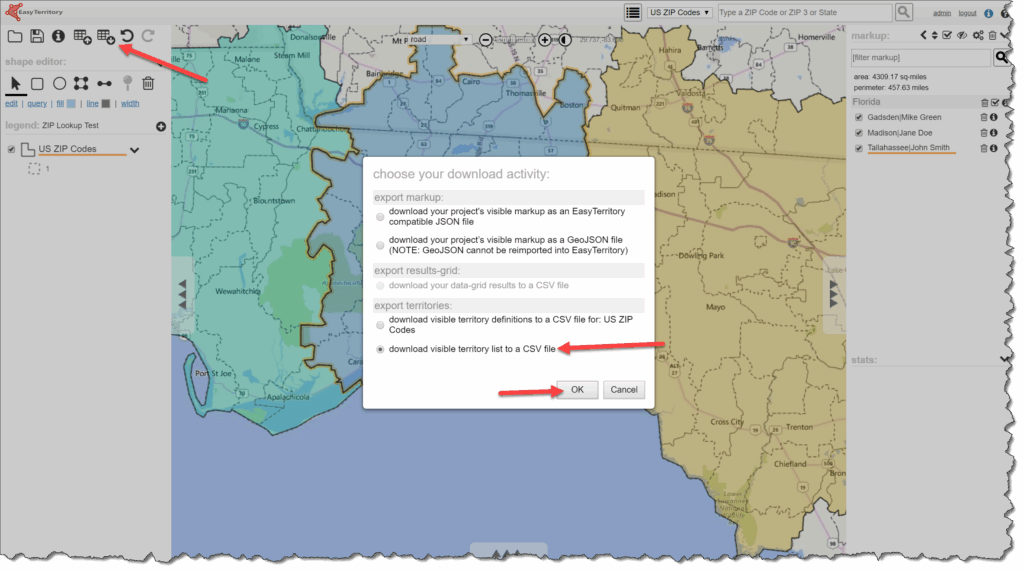
CSV Export Notes
- Columns (
col1–col8) represent territory labels split by group and/or pipe delimiters - The markupId column uniquely identifies a territory in EasyTerritory

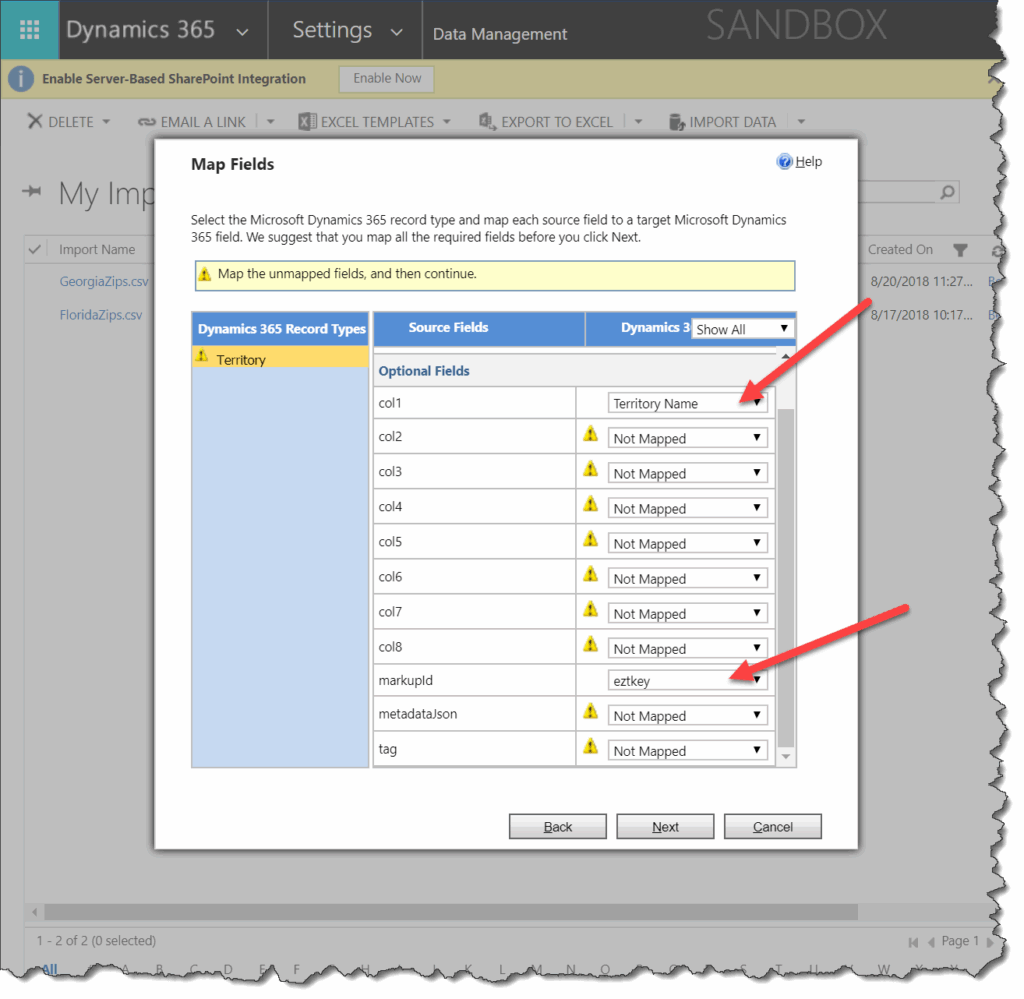
When importing:
- Map at minimum:
- Territory Name (
col1–col8) markupId→ your custom field (for example,new_eztkey)
- Territory Name (
- Additional columns may be imported if desired
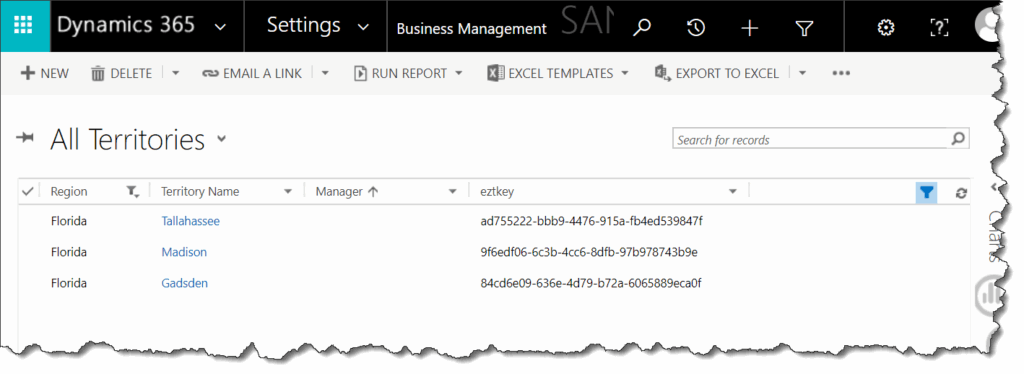
Once imported, your territories should now be visible in Dynamics 365.
Step 4. Create the Workflow in Dynamics 365
Create a new Workflow in Dynamics 365 Sales.
In this example, the workflow is created on the Lead entity.
Add the plugin:
EasyTerritory.Plugins.PostalCodeLocationLookup
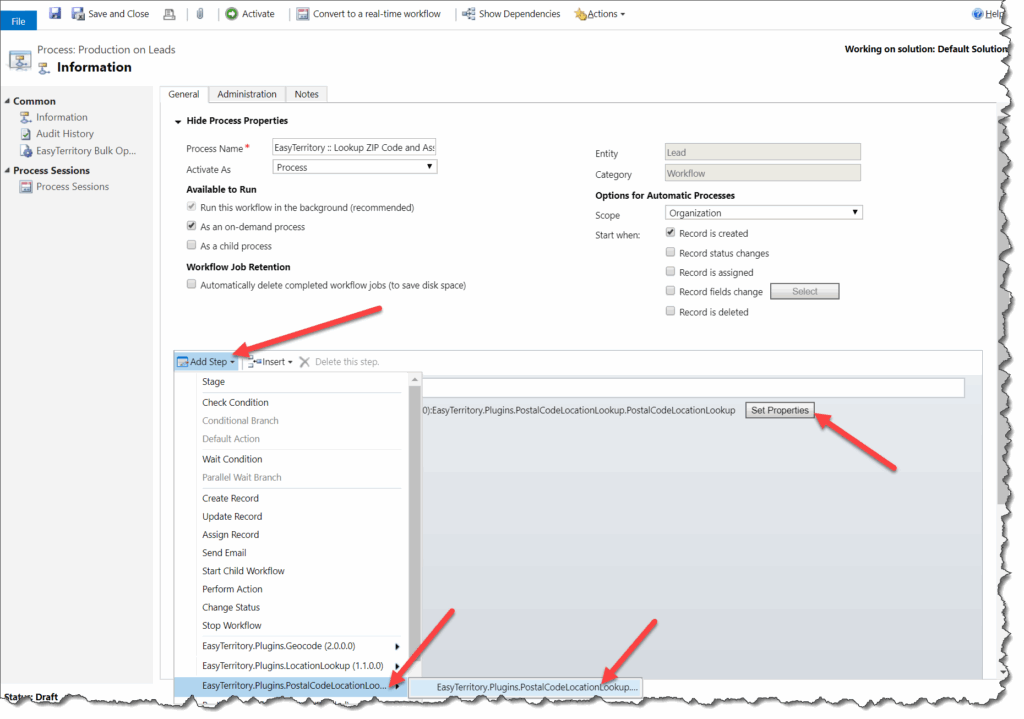
Click Set Properties on the workflow step.
Configure the plugin properties as described below.

Required Properties
- EZT URL
The EasyTerritory cloud URL.
Example:https://apps.www.easyterritory.com/{EZT_GUID}/{INSTANCE_TYPE}Where{INSTANCE_TYPE}isDEV,TEST, orAPP(APP = Production). - EZT Username
EasyTerritory CRM service user.
Request this from EasyTerritory Support. - EZT Password
Encrypted password for the CRM service user. - EZT Project ID
The EasyTerritory project ID created in Step 2. - Territory column name in SQL
The column in the EasyTerritory SQL table that contains the territory name.
Example:col1 - Postal Code Field Name on Target Entity
The ZIP/postal code field on the Dynamics record.
Example:address1_postalcode - Territory Field Name on Target Entity
The lookup field on the target record that stores the assigned territory.
Important:
- The Account entity includes an out-of-the-box territory lookup named
territoryid - The Lead entity does not include a territory lookup by default
- You must create one (for example,
new_territoryid)
- You must create one (for example,
Optional Properties (ZIP Code as Text Field)
Use these if your postal code field is a text field (default behavior in Dynamics):
- Territory Entity Name
- Territory Name Field on Territory Entity
- Out-of-the-box value:
name
- Out-of-the-box value:
- EZT Key Column Name on Territory Entity
- Stores the EasyTerritory
markupId
- Stores the EasyTerritory
- Territory Entity Primary Key Column
- Used to set the lookup relationship correctly
Optional Properties (ZIP Code as Lookup Entity)
Use these if your ZIP Code is stored in a separate postal code entity:
- Postal Code Entity Name
- Postal Code Entity Primary Key
- Postal Code Entity Postal Code Value Field
This approach is recommended when managing a large, centralized list of postal codes.
Additional Workflow Logic
You may optionally add workflow steps such as:
- Assigning the Territory Manager as the Owner of the Lead

The plugin also returns string values from the column specified in Territory column name in SQL, allowing you to populate text fields in subsequent Update Record steps.

Step 5. Test the Workflow
- Create a new Lead with a ZIP Code that belongs to one of your defined territories.
- Allow the workflow to run.

Once completed:
- The territory is assigned
- The owner is updated (if configured)

Step 6. Territory Realignment (Bulk Updates)
In cases where territories are added or realigned:
- Use the EasyTerritory Bulk Operation Utility
- Run the workflow in bulk across existing records
Refer to the Bulk Operation Utility documentation for setup instructions.