
One of the key benefits of EasyTerritory is the ability to make territory data available through a REST API. This is accomplished using the Project Territory (Markup) Plugin.
The plugin allows users to:
- Persist territory polygon data to SQL Server
- Expose territory data for use by the EasyTerritory REST API
- Create reusable catalog layers based on territory boundaries
This plugin is a foundational component used by other EasyTerritory features, including territory lookups and workflow plugins.
Step 1. Creating the Source Project
The first step in setting up the Project Territory (Markup) Plugin is to create a source project containing your territory definitions.
- Create a new EasyTerritory project.
- Build your territories using one or more geographic boundary layers, such as:
- ZIP / Postal Code boundaries
- County boundaries
- State boundaries
Territory Hierarchies
Territory hierarchies can be represented in two ways:
- Using Groups in the Markup Panel
- Using pipe-delimited values in the territory name
Both approaches are supported and can be used together as needed.
Step 2: Obtaining the Project ID
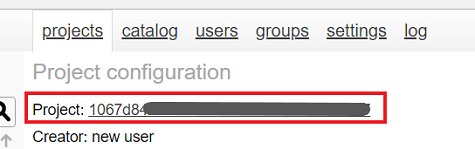
Once your territories are built, obtain the Project ID for the source project.
- Copy the Project ID.
- Open the Admin panel.
- Navigate to the Projects tab.
- Select the source project.

Step 3: Setup the Plugin
With the Project ID available, configure the Project Territory (Markup) Plugin.
- In the Admin panel, go to the Settings tab.
- Scroll to Plugin Configuration.
- Click + Item to add a new plugin configuration.
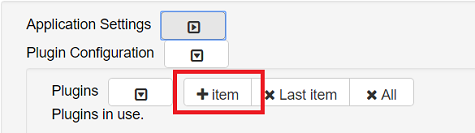
- Enter a name for the plugin.
- In the Assembly dropdown, select: OpenIntel.Plugins.SaveProjectMarkup

- In the Class dropdown, select: OpenIntel.Plugins.SaveProjectMarkup.PostProjectSave

- Enter the Project ID of the source project that you saved for the plugin.
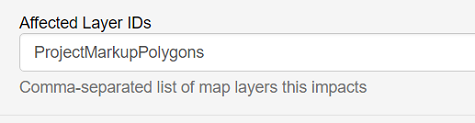
- In Affected Layer IDs, enter: ProjectMarkupPolygons
- Under Configuration, select: No configuration

- Click Save
Step 4: Run the Plugin
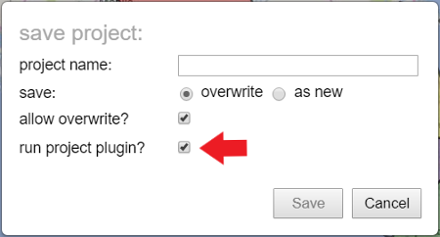
After the plugin is saved:
- A new checkbox will appear prompting you to Run the Plugin.
- Return to the source project.
- Click Save Project.
When the project is saved with this option selected:
- Territory polygon data is written to SQL Server
- Territory data becomes available via the EasyTerritory REST API
- The territory data can be used to create catalog layers for other projects
Instructions for creating a catalog layer based on this data are available in the catalog setup documentation.
For additional help please email: [email protected]